Isometric is a type of projection that gives the illusion of 3D without actually using true 3D. BYOND lets you make isometric games while taking out a lot of the hassle of determining how to arrange the graphics and draw them in the right order. That's a big help because the math and logic involved can be complex, and it just gets in the way of making the best game you can.
In BYOND's isometric system, north points toward the upper right of the player's screen, and east points to the lower right. It's as if the whole map was rotated 45° clockwise, and then instead of looking at it straight down you're looking at it at only a slight downward angle of 30°. This makes every map square into a squashed diamond shape. BYOND uses 2:1 isometric graphics, meaning that the angle the map is "tilted" makes every diamond half as tall as it is wide.
The first step to using isometric graphics is to set up your project by defining world.map_format and world.icon_size.
world
    map_format = ISOMETRIC_MAP
    icon_size = 64
I picked an icon_size of 64, which means we'll be using 64×64-pixel icons, because it's a good size to work with in isometric. The width of the diamond tiles is always the same as the width of the icons we use, so each diamond will be 64×32, and there will be 32 pixels left over at the top of each icon for vertical structures. Whatever size you choose for an isometric game, be sure the width is always a multiple of 4--otherwise the math will be subject to some rounding errors and you'll see seams between the tiles.
In Dream Maker, create a new icon and give it a size of 64×64. Create a new pixmap, and choose a color for the base tile, let's say a nice shade of gray. Then you'll see a menu option called Icon | Create isometric tile. Select that, and you'll see a diamond shape appear at the bottom half of the icon.


Take a look at that diamond and you'll notice a few things. The pixels on the very left and very right are blank. This is because of the way the diamonds will be fitted together. The lines along the edges however follow a perfect 2:1 ratio, with 2 pixels horizontally for every 1 pixel vertically. Select the line tool and then draw in some lighter and darker lines along the edges for shading. This will be a good base tile.
Now let's create a new icon for a wall. Let's say we want the walls to be red blocks, about 24 pixels high. Make a new icon and follow the same steps to make a plain diamond shape, in a light shade of red. Now use the selection tool to move that up to near the top of the icon. There should be 8 pixels of space above the diamond and 24 below. This will be the top of the wall. Hit Ctrl+X to cut this image and put it on the clipboard. Now choose a neutral color like white and create a diamond again, but leave it where it is. Hit Ctrl+V to paste the red diamond back over it.


Next, choose a medium red and draw a vertical line from just to the left of the top diamond (1,40) to just left of the bottom diamond (1,17). Draw another line like this at just left of the center, from 32,1 to 32,24. Switch to the fill tool and fill in everything between the two vertical lines so there's a solid color face there. Now repeat the process on the right, in a darker shade of red. Bingo; we have a red block. You can decorate it further if you like.


If you're wondering why the wall has the far left and far right pixels filled in, which wasn't the case for the floor or for the top of the wall, it's because gaps would show up if two of these walls were right next to each other. Notice that by doing it this way, the left side of the block is 32 pixels wide, as is the right side. By placing two walls next to each other they should form a solid unbroken surface.
Finally we'll need a mob icon, so just draw a circle about 32×32 and put it in the center of the icon. If it's 16 pixels from the bottom it will look like it's touching the ground at the middle of the diamond tile, which is perfect. Add some quick smiley features and there's a basic mob icon.
Now we can define some objects in the world.
turf
    icon = 'floor.dmi'

turf/wall
    density = 1
    icon = 'wall.dmi'

mob
    icon = 'player.dmi'
    pixel_step_size = 16
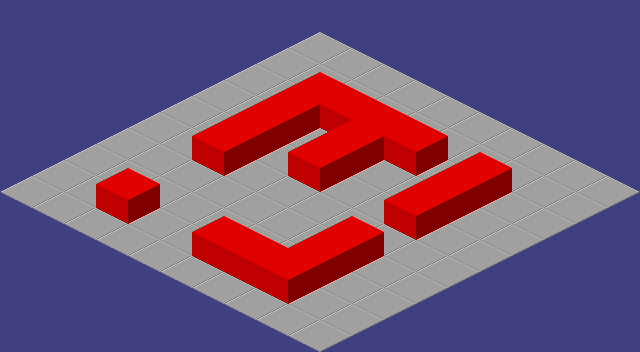
That's enough to get started, so let's build a map. Create a new map--nothing fancy, maybe just a 10×10×1. You'll notice the map editor has already laid out everything in isometric form--that's because world.map_format was set to ISOMETRIC_MAP earlier. Plunk down some of those red walls, then hit Ctrl+R to compile and run your project.
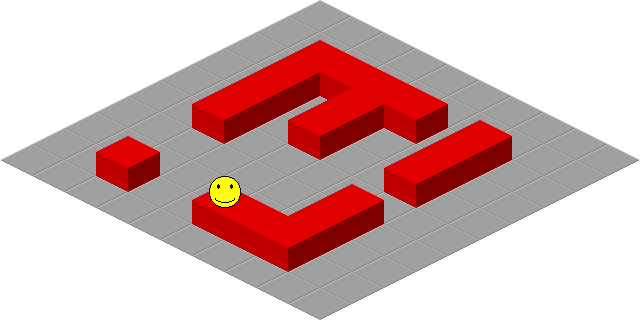
Try moving around for a bit. Probably the first thing you'll see is that hitting the up arrow actually moves your mob up and to the right; that's normal. Remember, that's the way north faces, and you're moving north. If this seems a little weird at first, don't worry about it--you and your players will get used to this quickly, and this control scheme has actually been around since Q*Bert.
The other thing you'll see that if the mob stands behind a wall, the wall will be drawn in front. This could also seem odd if you're used to thinking top-down, because in a topdown map the lower layers are always drawn behind the higher ones. But in isometric maps, you have to think in three dimensions even though the map isn't truly 3D. Tiles that are nearer to the viewer should always be drawn over tiles that are farther away regardless of their layer, right? So layers only matter for things that are on the same tile.

Moving around in this system should look pretty fluid, with one exception. If you move diagonally behind a wall, you'll see your mob temporarily drawn on top of the wall.
Like I said at the beginning, BYOND is only giving you an illusion of 3D. In order to draw everything properly it has to make some calculations and educated guesses about which order to draw tiles in. Nearer tiles get drawn on top of tiles that are further away, but what happens when your mob is between two tiles? In those cases, it has to be drawn in front of the nearer tile so that the floor of the near tile won't cover it up. So the reason you see the mob on top of the wall while moving diagonally behind it is that, as far as BYOND's isometric engine is concerned, the mob is temporarily on the same tile as the wall.
There are two ways to deal with this. One is to not allow players to "cut corners". After all if you did this in a topdown game, mobs would temporarily appear on top of wall icons while squeezing through a corner, and that looks bad too. Another way is to simply give the wall a layer that's higher than the mob. The layer will matter only when the mob and the wall are on the same tile, so it will cover up those visual gaffes nicely.
With a simple 10×10 map, the whole thing should show up on your map at any given time, since by default world.view is 6, which covers 13×13 tiles. For bigger maps, world.view or client.view (whichever you use) will determine the minimum number of tiles you'll see, with other tiles filling in to pad out the whole viewing area. This means two things: You can probably get away with using a smaller world.view, and if you use a HUD it's going to be smaller than it would be in a topdown game. The HUD is only as big as it has to be. In this tutorial the map is 10x10 and fills the whole screen. That makes a diamond 640 pixels wide, and 320 pixels high--plus there will be an extra 32 pixels for vertical stuff like the walls, so it's 352 pixels high in total. Every icon in the HUD is a 64×64 tile, so the HUD will be 10 tiles wide, and 6 tiles high. The Reference has a formula for calculating this if you need to, but with a HUD you can always use a relative screen_loc like "EAST,NORTH-1", so for most games you won't have to worry about that.
Now you know the basics of making an isometric game. There are more issues out there to explore, like how to handle big icons (and how not to), and the fact that you can use pixel_z to give your icons some vertical height. But the basics covered here should be enough for you to make a board game, strategy game, or RPG without any trouble. If you want to learn more about making isometric graphics, visit the BYOND Art Society or read some of the many pixel art tutorials available online.
The source files for this tutorial are available to download.