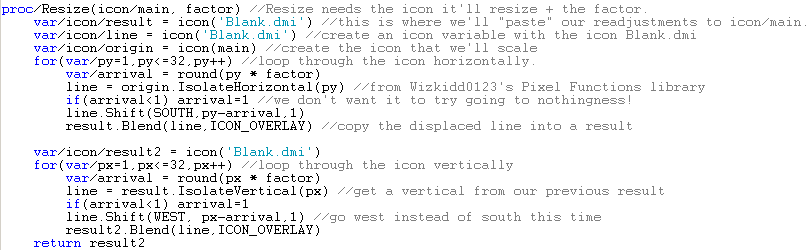
First we�ll look at how to make an icon smaller.
In order to get access to every pixel in the icon that we�re going to scale, we have to create a loop. To get every pixel, we would have to create two loops like so:

This would mean going through the icon 1024 times, which would obviously be very slow. This is why instead of going through the icon at a pixel based level, we�ll go line by line. That�ll mean just creating one loop running 32 times.
Lets assume we�ll be scaling an icon to half its original size. This�d mean that a pixel at (32,32) should appear at (16,16). And in the same way, a pixel at (1,1) should appear at (0.5,0.5). Unfortunately, we can�t get decimals in the icon since by definition, a pixel is an indivisible unit. So we�ll have to round all units. There�s a simple formula for where we want our pixels to appear � round(current_pixel_location * factor). We can test this formula; if the factor = 0.5: round(32 * 0.5) = 16 which is of course correct.
In order to get the pixel at one point to move to this location, we must use icon.Shift().
At this point, the main problem is getting a line from the icon that we�re scaling. Wizkidd0123 has made a library called Pixel Functions which is able to isolate lines and single pixels too. The way it works is that you specify which icon you want to isolate something from, which exact line and whether it should be isolated vertically or horizontally.
We�ll start by looping through the y co-ordinates. This�ll mean we have to isolate a line horizontally (think of a graph with the line y = 5 � the line would be horizontal). Next we figure out where this line should end up using our formula. Next we have to move the line there using Shift(). And finally we have to Blend() the displaced line into a final result. The problem is, we don�t know how much we want to Shift() and which direction.
Since we�re taking horizontals, we have to Shift() these vertically. And since we�re scaling to make the icon smaller, we have to Shift() south. The amount by which me must Shift() is given by this formula: current_pixel_location � round(current_pixel_location * factor) . If we test this at factor 0.5 for the line at (32,32), we get: 32 � round(32*0.5) = 32 � 16 = 16. This makes sense because if we move a pixel at (32,32) down by 16 pixels, it�d appear at (32,16) which is where it should appear when the icon is halved. This pixel theory applies fully to lines as well.
We get this:

The icon right now has only been scaled vertically, we have to scale it horizontally too to get a full effect. All this means is that we loop through the x co-ordinates and isolate vertical lines rather than horizontal. We can save each line into an icon and this icon would be the final result.
The key thing here is that we�re now scaling something that has been scaled once � we�re won�t be scaling the original icon.
Ok this was easy enough, but what if we want to scale it and make the final result greater than before? i.e. Have a scale factor greater than 1.
The first thing to realise is that we�ll have to go outside the regions of 32x32 icons. What we have to determine is how many icons are needed. If a 32x32 image is doubled, you get an image with the dimensions 64x64. If we look at this in terms of icons, you get 4. A tripled image would have the dimensions 96x96, which means 9 icons. A quadrupled image would have the dimensions 128x128, which means 16 icons.

It becomes clear now that the total number of icons is the factor^2 (factor to the power of 2). But when the factor isn�t an integer, we get decimal answers. Rounding the answer is not safe because if the total number of icons is 5.4, it�d round to 5 which means there is still a 0.4 that hasn�t been taken care of. For this reason, we have to round every thing up. So even if the total number of icons is 5.01, we have to round this up to 6. A process to do this is commonly known as ceil() (ceiling).
<img src="http://img.photobucket.com/albums/v234/deathawaitsu/ a3_45.png"
We now have to think of how we�re going to save these icons systematically. A good method is to save it in a 2D list - L[x][y]. What we can do is, say that first lets scale the icon across the screen. Add each of these scaled icons into L[x][1]. Then what we do is take the icons in L[x][1], and scale them up the screen. We can save them as L[x][y]. So effectively, you get a list of icons. That list has a list of icons going across the screen. Those lists have a list of icons directly above them.
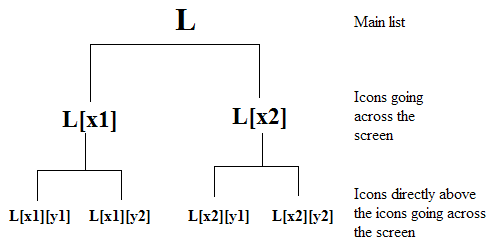
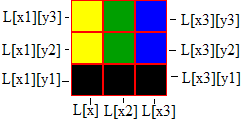
Please note that nothing will actually save at L[x], we�re saving at L[x][y].
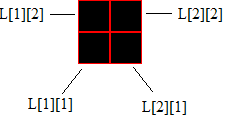
If we�re doubling the icon, we�ll have 4 icons in total. L[2][2]. 2 icons will be going across the screen. Those 2 get saved at L[1][1] and L[2][1]. Then the icon above L[1][1] gets saved at L[1][2]. The icon above L[2][1] gets saved at L[2][2].
We have to come up with a system that�ll create a list like that for us. The icons going across the screen is sqrt(number_of_icons) and going up the screen is again sqrt(number_of_icons). Therefore, our list of icons would be:
var/list/icons[sqrt(number_of_icons)][sqrt(number_of_icons)].
Then we have to add Blank.dmi to each of element in the list.
This is a nice way to do it:
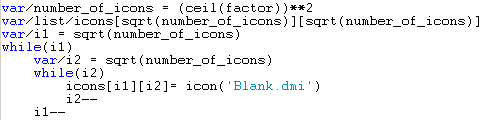
The next job is to work out how many pixels wide the icon will be. This is easily achieved by doing sqrt(number_of_icons) * 32 which for integers will be factor * 32. Our loop this time will be go through py = 1 to total_pixels. When we�ve completed 32 lines, we have to tell the process to move on to the next icon across the screen. We first have to create a variable to track how many lines have been completed, lines_completed. To move on to the next icon across, we do L[current_across_location + 1][1]. This means we have to keep track of which across icon we�re on, we can call this current_image. We�ll also have to add a number variable to keep on increasing as the loop goes on, we can call this across_switcher. When ever we switch an icon, lines_completed will be restored too.
Now we have to figure out which line to isolate and the Shift() value. We�ll call create a variable for the line that we�ll isolate, grabber. If we do 1/factor, we can start to figure out which line to isolate. To keep things simple, from now on we�ll assume that the factor is 2. 1/factor = 1/2 = 0.5. Each time a pixel is looped through, we can add 0.5 to grabber. We�ll obviously have to ceil() this value when ever we need want to isolate a line. 0.5 ceiled will be 1. So when px = 1, get line 1. When px = 2, add 0.5 to grabber. Therefore grabber will be 1. So when px = 2, get line 1. We also need to work out a Shift() value. We�ll make a table to see what happens:
| Px | Grabber (ceiled grabber) | Shift |
| 1 | 0.5 (1) | 0 |
| 2 | 1.0 (1) | 1 |
| 3 | 1.5 (2) | 1 |
| 4 | 2.0 (2) | 2 |
| 5 | 2.5 (3) | 2 |
| 6 | 3.0 (3) | 3 |
What about scale factor 4?
| Px | Grabber (ceiled grabber) | Shift |
| 1 | 0.25 (1) | 0 |
| 2 | 0.50 (1) | 1 |
| 3 | 0.75 (1) | 2 |
| 4 | 1.00 (1) | 3 |
| 5 | 1.25 (2) | 3 |
| 6 | 1.50 (2) | 4 |
Our method of ceiling grabber is working out well. But we need a formula for the Shift() value. Look at the table, there is a pattern between Px, ceiled grabber and Shift. Shift = Px � ceil(grabber).
Putting this all together, we get:
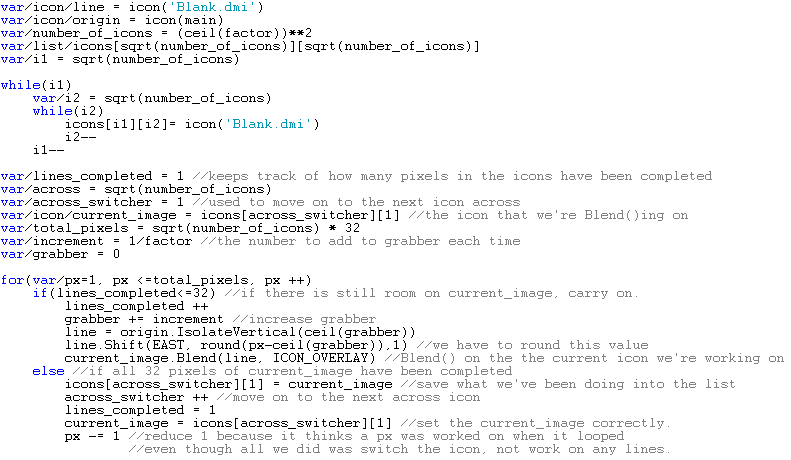
Since our scale factor is 2, our list will look like:
L[1][1] = Horizontally scaled icon
L[1][2] = Blank icon
L[2][1] = Horizontally scaled icon
L[2][2] = Blank icon.
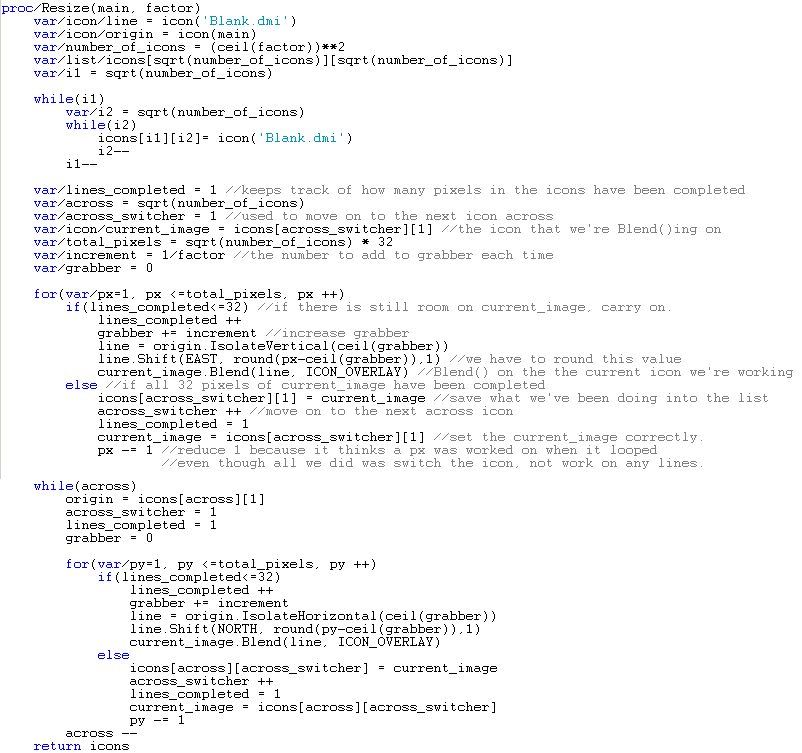
The next part is to scale the horizontally scaled icons vertically. First we create a loop, looping through all the icons across the screen. Next we have to scale each of these across icons vertically. Thankfully, this means running a similar loop as the horizontal one. But we have to change the condition for how current_image is switched.
In the image above, you�ll notice we created a variable called across that we never used. The use comes in now. First we do a while(across) loop, removing 1 each time that icon has been scaled. This means we get the bottom right icon and scale it up until the bottom left icon has been scaled up as well.
The image being scaled will always be icons[across][1]. And now across_switcher will play the role of vertical_switcher, but we�ll keep on calling it across_switcher for simplicity�s sake.

As for saving into the list, all we have to do is L[across][across_switcher], That�s literally all there is to change.
As a final result, you should get this:
The method only works when the factor is greater than 1, so what we can do is to check whether the factor is greater than 1 or not. If it is, use the above method. Otherwise, use the method that we first started working with.
Now you may wonder what you can possibly do with a list of strangely organized icons. The possibilities are endless but in order to unpack the list, you can do this:
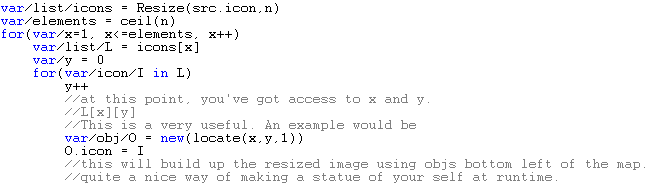
So then, who needs to go into Microsoft Paint and spend ages importing and exporting images into Dream Maker when you can scale icons using DM it self?
Reading them will still have to wait, though. I have little time to program (or think about it) lately.